
DIY Lighted Christmas Wreath for under $20 from Dollar General

This simple DIY Lighted Christmas Wreath Craft is sponsored by Dollar General. All opinions are mine alone.

Time to break out the Holiday cookies and Christmas Music! The Christmas Season has officially begun!
When I get a few moments of downtime, one of my favorite things to do is turn on my favorite Christmas music station, bust out the glue gun and start creating easy homemade Christmas Wreaths to decorate my home.

Usually, I love to see all the various styles of Christmas wreaths in the stores. But ultimately, I’m not a fan of the cost. Plus, I would still want to personalize the wreath once I brought it home. So instead, I like to grab a few affordable supplies and just make it all myself.

This year, I wanted to show you that you don’t have to spend an arm and a leg to make a fun lighted Christmas wreath. And you don’t have to pay the high price tag for supplies at a regular craft store. You can make a festive lighted Christmas wreath all with a few items you pick up from Dollar General.

I love to get a lot of my stocking stuffers at Dollar General, as well as picking up paper goods for the easy DIY Breakfast Buffet Bar for when company comes to visit.

So while I was at Dollar General picking up those supplies, I also stopped by the Christmas section and found all kinds of fun decorations I could use to make an easy homemade Lighted Christmas Wreath. And all for under $20!
Easy Homemade Lighted Christmas Wreath
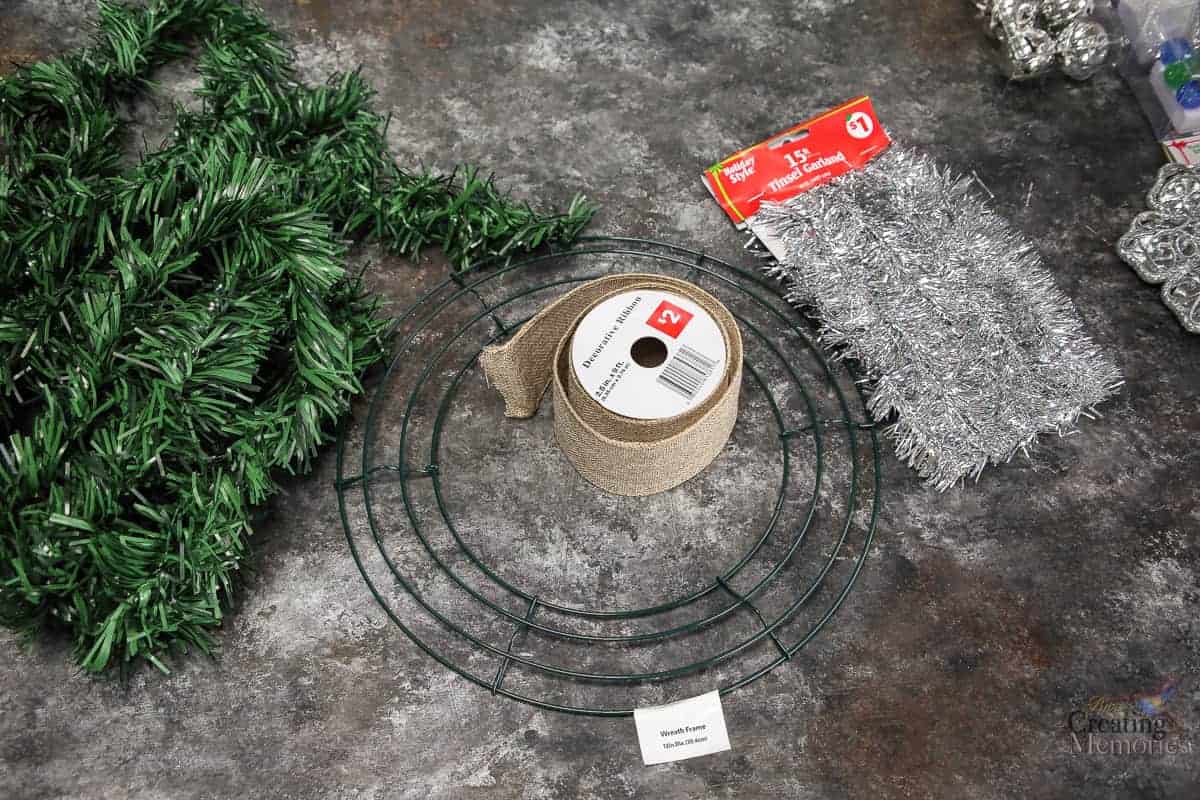
Some of the items you will need to make this simple homemade Lighted Christmas wreath include:
- 12″ Wire Wreath Frame ($1.50)
- a 15 ft pine garland ($2)
- one 15″ Tinsel Garland ($1)
- One roll of 2.5 in X 9 FT Burlap Decorative Ribbon ($2)
- One can Santa Snow ($1) – optional
- 2 packs of 10 ct battery operated LED lights ($3 each x 2 = $6)
- Various Christmas Tree Ornaments (range anywhere from $1 each to $3 a package)
- Floral wire (on hand)
- Hot glue gun and hot glue (on hand)

The very first step is to turn on your favorite Christmas music to help get you in the holiday mood. Plus it’s always better to craft with music playing.

Begin by wrapping the burlap ribbon around the wire wreath frame. You will want a nice background to the garlands for the few spots that will be visible.

It is OK if the ribbon doesn’t cover the entire wreath. You will want to adjust it so it covers most of the wreath, but can still leave just a little bit of the wreath frame exposed.

This will be considered the top of the wreath. But don’t worry, it will be hidden in the front by the finishing touches. But it will make it easier to hang without having to fashion a hanger.
On the back of the wreath, wrap the burlap ribbon over the wreath and hot glue both the start and end of the ribbon into place so it won’t shift or come apart.

To protect your fingers from hot glue burns, I like to use a bamboo skewer to press the layers together. This way, I don’t burn my fingers, but I can still get a firm seal to hold the items in place.

Take the pine garland and hot glue it into place on the back of the wreath frame at the same place that you started the burlap ribbon.
Loosely wrap the pine garland around the wreath. Make sure to leave a few inches of the burlap ribbon exposed between each wrap.

Once you reach the top of the wreath, hot glue the pine garland in the same place you started. Trim off the excess garland.

Take the tinsel garland and hot glue it in the same spot you just finished the pine garland.

Begin wrapping it around the wreath. You will want to wrap the tinsel garland twice in between each layer of pine garland. continue wrapping around the wreath until you reach the top of the wreath.

Hot glue the tinsel garland at the same spot you began. Trim off the excess tinsel garland.

If you want a “frosted” look to your wreath, take the wreath outside and very lightly mist it with the Santa Snow. And I do mean VERY LIGHTLY.
Make sure you are 12-18 inches or more away before you spray. If you get it too thick, it will take much longer to dry. It won’t take much to give it a very soft mist of snow.

Allow it to dry 1-2 hours before moving on.

Once the snow is dry, you can begin attaching the LED light strings. For this, you will want floral wire or a twist tie of some kind.
Attach the battery pack with the twist tie or floral wire to the back of the wreath at the top where the wreath frame is exposed. Be sure to keep the battery pack hidden in the back of the wreath.

Carefully wrap the string of lights around the wreath. Try to arrange it so the lights are spread out across the wreath. Not all on the outside or inside, but evenly spaced.

If the lights don’t want to lay where you want them, you can use more floral wire to tie them in place.

Secure the end of the light string with more floral wire. Attach the second battery pack at the back of the wreath near the top with floral wire and wrap the second string of lights around the rest of the wreath going the opposite direction from the first. Secure the end with floral wire.

Now, take the various ornaments and play around to see what layout you like best.

Try placing different ornaments in different places. Then rearrange with other ornaments to see which you like best. This is how you can make your wreath completely your own!


If you happen to see the pinecone ornaments at Dollar General, they would look beautiful on this wreath. Sadly, I was one second too late to get them, as another customer in front of me grabbed the last pack that my Dollar General store had in stock. I was so close!
So I had to change up my idea a little and use different ornaments that were still in stock.
I used the Silver glitter Poinsettia 4 pack ornament clips ($1), a big Gift bow ($1), A large snowflake glitter ornament to hang from the center ($1) and a few small ornament balls from the $3 pack.

Once you have the ornaments laid out how you like them, you can begin to glue them into place with the hot glue.

Glue one piece at a time, so you don’t lose the layout you just created.

With the ornaments, you will want to glue the top to the wreath. But you will also want to glue in between each ornament where they touch each other. This helps spread out the weight and give your ornaments a stronger bond.


If you want to be able to change up your ornament decorations from time to time, you can instead attach the ornaments with floral wire so they won’t be permanently attached.
If you want an ornament hanging in the center of the wreath like mine, you will want to tie it on with floral wire, hanging directly down from the top where you will hang the wreath. This will help your ornament hang evenly.


Make sure to add something special to the top of the wreath to cover the wreath frame. This could be a larger pinecone ornament or a holiday bow of some kind.


Once everything is attached, take a moment to fluff the garlands. Sometimes they flatten or shift. Adjust to evenly space out the garlands, fluff the needles and take a step back to make sure it is balanced.


Now you are done and you have a personalized homemade lighted Christmas wreath to hang in your home. And all for less than $20! My wreath ended up costing only $19.50!

And don’t forget to turn on the lights when the sun begins to set! Even just hanging this lighted Christmas wreath on my pantry door in my kitchen gave it prime lighting to really show off the lights.

As it gets even darker, the lights stand out more. But not only that, all the glitter ornaments and tinsel begin to twinkle and shine.

You can hang this indoors or even on your front door! And since the battery pack is at the top of the wreath in the back, it is really easy to reach behind and flip the on/off switch of each string of lights. I don’t even have to take the wreath off the door.

Be sure to visit your local Dollar General for great prices on stocking stuffers and holiday decorations. You can make all kinds of fun holiday crafts all while staying within your budget.
Don’t forget to use their app with digital coupons because you may be able to save even more!
If you want a larger Holiday wreath, try our Christmas Tulle Wreath.

To help make your home to have the feel of the holidays, try our Magical Homemade Christmas Potpourri Simmer Pot.

You can also make these easy Snowman Ornaments with your kids.

Or try these DIY Rustic Christmas Ornaments.

You can also make these simple Crochet Snowflake Ornaments that also make beautiful gifts for friends, neighbors or family.

Don’t forget to Pin this Lighted Christmas Wreath for later.


